Sunday, August 31, 2008

LESSON 2


Thanks to everyone for all the great posts and comments on lesson 1. We're going to be moving on to trickier territory, moving that egg head around. Remember focus all your attention on this angle. You know the drill, practice it all week then post your best one for critique. I'l be posting new lessons every Sunday evening.

-David Omar

Lesson 1 by Gabriele Gabba

I consider myself very fortunate to be a part of this really great project! Thank you to everyone involved!

Here's my lesson 1:


I think the last one turned out okay, but i think i need to raise the jawline..

P.S:
Thanks for all the great links to the old articles on John's page.

Btw, can anybody tell me if this blog older than us 15 joining recently, or was there a previous batch of artists before going through this book?

Saturday, August 30, 2008

Lesson 1 by Clinton

Hey fellas! Thanks for allowing me to be a part of this learning venture. This will help me a lot, and I hope that I can help you all here and out there. Here is my lesson one:


Friday, August 29, 2008

drawin' tips

UPDATE:
Having trouble with eyes? Another important idea to employ is "eye-construction"! Draw a horizontal and a vertical line which curve appropriately to the contour of the eye with, in most cases, the pupil centered where the lines intersect.

Hey guys! Just some advice that has really helped me, if you haven’t already thought of it;

John K. has said a number of times that a good way to see if what you’re trying to learn is sinking in is to draw it from memory. He has specifically mentioned it while talking about caricatures and toy-construction, but I believe it applies to everything.

Also, he has mentioned, for those learning how to draw a character or something, to go ahead and trace it 2 or 3 times to get a feel for the shapes.

Just thought I’d share. Any more tips you always keep in mind? I love to talk draw!

drawings by John K.

Thursday, August 28, 2008

LESSON 1 by Wicks for Candlesticks


Preston is definitely the great equalizer in cartooning.  This is my second time going through the lessons.  Cause of that I thought I could get through them easily, but it still took a lot of sheets of paper before I understood the nuances of the head.  Thanks again for the critiques in the past posts.  I used them to figure out some of the difficult shapes , like that damn mouth.   

Feel free to let me know what I missed and messed up on.  I want to get it perfect the next time I draw it.

-David O.

Wednesday, August 27, 2008

Lesson 1 by Jeremy


I was feeling ok about this one...until I overlaid Preston's drawing on top of mine. Is anyone else having a difficult time drawing an oval? I know, I know, it should probably be the easiest part; but if my initial egg shape is off it throws off my entire drawing. I think this is mainly because it throws my guidelines off-kilter. Anyways, there are some pretty blatant mistakes here (shape of the chin, angle of the eyes and the position of the nose). So, I will most definitely be tackling this lesson again. Just wanted to post something before everyone else moves on to lesson 2.

Tuesday, August 26, 2008

Head Constructions by Jim Grue

I wanted to give the head construction a shot. I got to say, it's REALLY hard to copy something exactly, but you have to at least try. One of the things I taught myself is do not press hard on your pencil when you draw. You just end up destroying the piece. Don't go too fast or slow, and make sure the lines flow. Here are my practices. original on the left, mine on the right.


My first one. I'm not to proud of it. The head is not at an angle and his nose does not curve up.


I thought this one was ok. I think I made the eyes too big, plus the head does not curve enough in the back.


Head is not tilted enough. Beak isn't wide enough.


I think this one came out ok too. Although his face looks like it's being pulled forward.

Well, there you have it. I'm not going to be hard on myself and I'm not going to reevaluate myself as an cartoonist/animator, but this lesson has taught my to pay better attention to detail. Next time, line of action!

Monday, August 25, 2008

lesson 1 by patrick

3rd UPDATE:
I really wanted to nail this down before moving on to the different angles. I'm still working on those lower cheeks and the eyebrows, and being confident with the round shapes. I'm getting more satisfied with the life & warmth of the face

2nd UPDATE
The measurements are getting closer, but I think the drawings need to be full of more life

1st UPDATE:
This is probably my 10th try. I'm havin' the darndest time with the eyebrows, and being confident with the eye shapes.
I really gotta retrain my discipline and concentration. And again, I'm really stoked to be not only going back through this book, but with fellow cartoonists!


It's been great getting back into this book after several months. I'm seeing what areas I've developed and which ones I still haven't.

For me, it all comes down to concentration. When my accuracy fails I know it's because my concentration slipped.

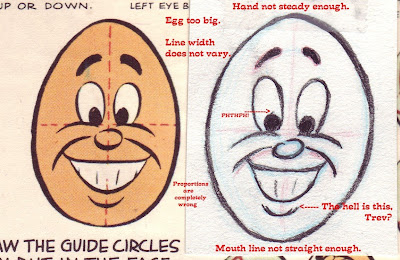
Here's my egg comparison. the differences are obvious

Can't wait to see everyone else's, have fun!

Remember to use the Labels


I have a thing for organization. Remember to use the labels with your name and the lesson number so we can easily compare each others, and our own progression.

Sunday, August 24, 2008

Lesson 1 by Caleb

This is my first sketch:
Then, I made sure to get a better egg shape and did this:

Here's the overlay of the second sketch with the original:
-the head shape needs to be a little wider
-the cheek lines are off and uneven
-eyebrows too big, too far up
-nose too oval, eyes too big

If I draw more, I'll add to this post.

Lesson 1 by Trevor


Well, there's a lot wrong with this, in my harsh opinion of myself. But, I think the biggest problem is that I still haven't solved the Photoshop problem yet.

I think that my initial measurement being wrong screwed everything up, but I have a theory that maybe those proportions may be correct in conjunction with the other one. If I could lay this on a transparency, that issue would be solved.

Can anyone do this for me? I'll be your best friend!


See, if you were to resize mine a little bit, I think the proportions would line up. But I don't know for sure.

Also, I think if we were to all download this lesson / video that John did from Heckling Hare it would really help. It's one thing reading the book, it's another thing watching a pro drawing it and explaining. It really helped me with line control, and I still watch it avidly.

Seriously, if you don't have it, go download it and watch it like it was your favorite episode of Ren and Stimpy.

Thanks gang!

Yr. buddy,

- trevor.

Saturday, August 23, 2008

Lesson 1 by Gabe


Here is my first attempt. I checked the drawings in photoshop and the only one that came out close is the front face of the squirrel/chimpmunk. I have a lot of work to do to get the correct proportions.

Friday, August 22, 2008

CLEAN-UP (Inking)


Hi Everyone,

I  picked up a great  book on inking called  THE ART OF COMIC BOOK INKING.  Interesting read, and it has a great chapter on cartoon inking (which is posted above).  I think it will help the members who are going to give inking a try with their Blair lessons.  

I've also received some emails asking for technical help with ADOBE ILLUSTRATOR.  Trying to answer these questions has made me realize that we all share the same frustrations. I'm going to open up the comments to discussions of your techniques and tips for this often times difficult software.

Have a great weekend,
David Omar

P.S. Added some new links for inking techniques.  Have a look.


Thursday, August 21, 2008

Caricature it...

Hey guys, it's James.

Before we all begin posting, this is something I thought of when I first looked at the Blair book a while back. This is just a suggestion, and I want your input.

After each lesson you have your drawing perfected and real nice looking? You've become a master at that particular drawing? You can draw how you were trained to draw it. But we all want to develop our own unique styles. So keep the pose the same and all that, but caricature what you see. It gets more fun as the lessons go on. You can play with proportions, but keep it the same character just exaggerated. John made a post on this a while back...

John K Lesson 8: Proportions Affect Design Contrasts


John K: Designing a Character

It's just an idea. What do you fellas think?

-James

PUBLIC?

Hello everyone,

Should we go public ?  There's the benefit of teaching more cartoonists by example.  We could still keep limited membership to keep a tight network.  

Should we keep comments enabled for members only?  The plus side is that we know who is commenting.  The downside is if a pro wants to chime in  with valuable advice, they won't be able to.

Please, everyone comment with a vote and any other positives or negatives I'm overlooking.

-David Omar

Wednesday, August 20, 2008

UPDATE

I'm glad everyone is getting acquainted on this here blog.  As many of you have probably guessed, I invited people that comment and link their work on John K's blog.  John states that the Preston lessons are the only thing you need to become a great cartoonist.  I got to about lesson 5 and stopped.  I'm hoping that by having a support system we can slowly but surely get through the whole book.  I don't know how long it will take, but hopefully everyone here will stick around for the journey. 

I wanted to bring up the subject of clean-ups.  I know a lot of members here are as eager as I am to perfect our inking skills.  I'm suggesting that after we get our best version of our lesson tries, we try to ink it.  We could post the best pencil side by side with the inks.  Learn 2 things at once.  Does this sound good.  I'm not sure if everyone here has a Wacom, but I'm sure a brush or pen  would be fine.  Please give feedback on this. 


Thanks again for joining,
David Omar

Tuesday, August 19, 2008

LESSON 1: Head Front


Please work on this over and over and post your best one on this blog.  Remember to check your work like it states on one of the links on the side panel.

EDIT

We are going to go really slow. This will help us understand everything before we move on to the next lesson. Yes, we are only doing the front view of the head this week. Then we will  analyze each others work, and I'll post another lesson.  I want to make sure everyone gets feedback before we move on to the next lesson.


OUR BIBLE


Hello All!

The purpose for this blog is simple.  It exists to give us a tighter networking system for learning and sharing ideas.  At this point membership is limited to a few, until we can get organized.  

From the picture above you can see that we will be focusing on one book.  If you don't have it please buy it or print out the one on the    ASIFA BLOG.  We will follow the book step-by-step, critiquing and helping each other along the way.   There will be one assignment per week.  

Please be aware that this blog is for people that want to become professional cartoonists.  If you are just doing it for shits and giggles, you can find plenty of other sites.  I want everyone here to be serious about making funny cartoons for a living.

-David Omar